Star Wars – Tenel Ka Djo’s Lightsaber [PROP]
Tenel Ka Djo has been one of my favorite characters for well over a decade and I’ve always adored her lightsaber (the one after her accident!) – she made the hilt out of a rancor tooth because she is pretty badass. There’s also the fact that she’s half-Dathomiri and it’s part of her heritage and all that jazz, but it’s mostly because she’s a badass. XD
When I was first going to do a Tenel Ka costume at Celebration III (the NJO/Strike Team version and the first Queen Mother version I made), I knew I would need to figure out a way to make something that resembled a tooth. I had absolutely no idea how to do this though. There hadn’t been any pictures of her saber released and I wasn’t good with anything prop-related (not that I am now, lol). Enter my sister and a trip to Home Depot. We fiddled around in various sections and ended up getting some bits and pieces, a length of pipe, and some spraypaint that made whatever you’re spraying look like stone. It was a tannish-beige color and I thought it could pass for a tooth well. My sister helped me throw it all together and I was pretty proud of what came of it. It didn’t have a point at the end (it had a decorative little swirly trinket that was actually a drawer handle XD) – but the texture and leather-wrapping and stuff gave it toothy/Dathormiri-ish sort of feel, which I was happy with.
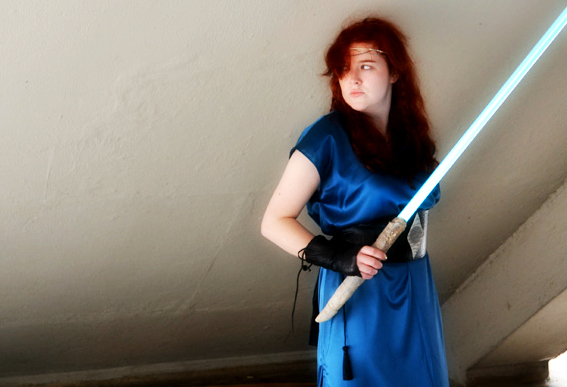
Fast-forward to a couple of years later, when I had the urge to make another version of this saber! I ended up with another thin piece of pipe and gray stone spraypaint this time, along with black leather wrappings. I had a plastic replica of a T-Rex tooth that was cut and whittled down to fit into the pipe and I loved this version as well. It was after I finished this version that Tenel Ka got her own book cover (Legacy of the Force: Tempest)! And look, her saber! Besides that image of it, another one popped up in The Essential Guide to the Force. I was so giddy that there was more art of her as well as her saber. That was when I stumbled across Nocturne Armory! They had made a version of her saber that looked exactly like the one in The Essential Guide to the Force and I fell in love with it and emailed them about ordering one. This one actually had a blade and lit up too! They had toned down the blue and added a bit of yellow to give it a more turquoise shade and I was so nervous every time I was in costume with it cause I was afraid I would mess it up (I am so clumsy, it’s not even funny). It is definitely a prized possession of mine since I am a huge nerd. ;D
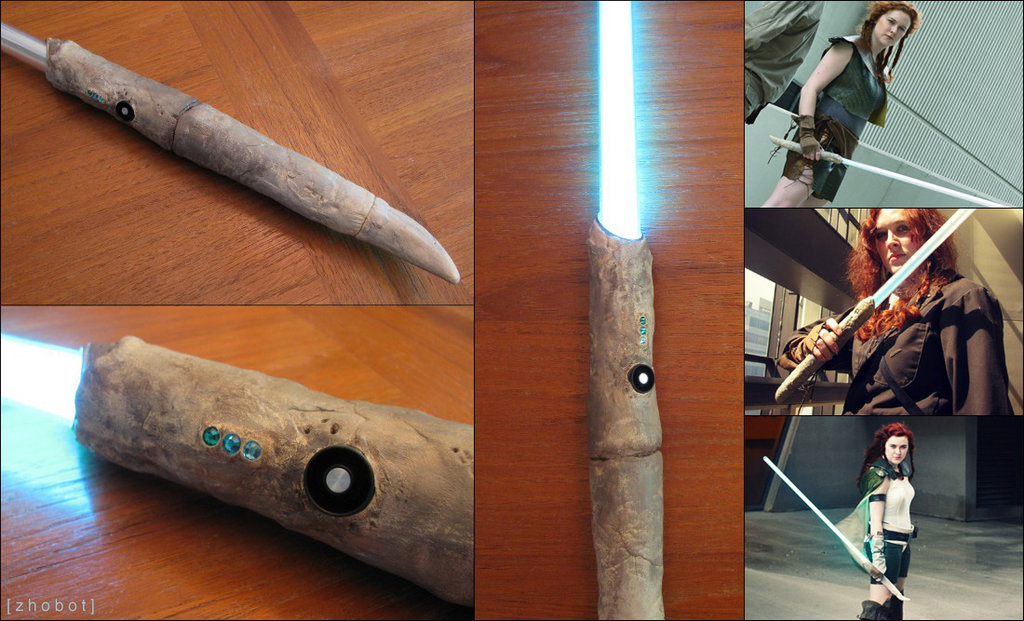
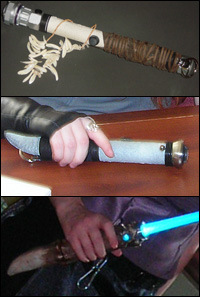 To the left are the three versions I have had in the past, two made (top – 2005, middle – 2006 and one ordered in 2008). 🙂
In the summer of 2010, the stupid bug bit me again about making another one (I don’t know what it is with me). And I was told about ultrasabers.com! Nate was looking for a saber he could use for his Jacen and/or Caedus costumes and my brain started working at a way to make a Tenel Ka lightsaber myself by modifying one of the ones from the site (even though the closest they had to her blade color was bright blue). The idea hadn’t really formed, it was just sort of hanging in the back of my mind – but when I saw a few weeks later that they had two new blade colors, one of which being Sunrider’s Destiny (which was a lighter, slightly more greenish shade), I knew I had to go for it. I had a vague idea of what I was going to try so I bought all the supplies I would need and then ordered the Rifter hilt from Ultra Sabers. (Unfortunately, the Rifter hilt isn’t on their site anymore.)
When it arrived, I played around with it like a dork (you know, the norm: making lightsaber noises, hitting furniture, the whole nine yards) and then detached the blade and started to attempt to figure out how to get the idea that was in my head out. I used paperclay to cover the hilt and start shaping a sort of tooth texture. I knew that I wanted to keep it as thin as possible – I knew it wouldn’t be as thick as the picture from The Essential Guide to the Force – because I am short and have small hands, hehe. I wanted my hand to be able to fit around it comfortably, but besides comfort, I didn’t want it to look SUPER GIANT when I was holding it. XD I knew it would be longer than the images as well since I had to cover the whole hilt and then add on the tip of the tooth at the end. I was fine with that though, as long as it wasn’t awkward to hold.
The paperclay worked so much better than I had hoped. It was lightweight and dried on its own (I wouldn’t have been able to put it in the oven to dry since it was around the saber). After the initial part of the hilt was covered, I had a grand old time trying to figure out how to make the tip of the tooth and then be able to remove it to replace the batteries when they ran out of juice. I finally settled on making the tip out of paperclay and fashioning the other end to fit into the opening where the batteries were. I covered the end in felt so it had a snug fit and then made some touch-ups with leftover paperclay to the main part of the hilt. I also added some details here and there – scratches, marks, wearing, etc.
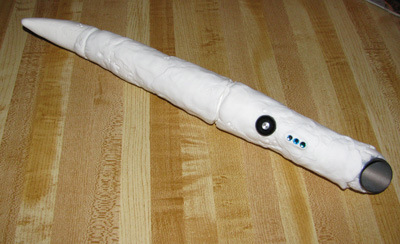
The three blue crystals I added above the switch are for decoration (and fall in with the whole half-Hapan thing as well, since there was talk of gems of Gallinore when she made her saber – even though those were the focusing crystals, lol ;D) and were chosen for their colors. I thought they matched the blade well and I sort of fell in love with them when I found them. In one of the images of her saber, there is a dark orange gem near the blade, but I ended up going with blue because none of the orange ones I looked at caught my eye. Plus, if I had an orange gem then I would have orange/blue (in the blade) and those were my high school colors. Somehow in projects I always subconsciously avoid putting those together because it just reminds me of high school, haha~ XD I just ended up going with all blue. I added the crystals while the paperclay was still moldable and then waited for the whole thing to dry.
After that came the part I was REALLY worried about. I’ve never been good at painting things!
I had three shades of acrylic paint I was planning on using to paint the hilt: unbleached titanium, raw umber & raw sienna. The one I ended up using the most was the unbleached titanium shade. I gessoed the whole thing first (the main part of the hilt and the removable end) and I used a small brush to paint the whole thing with the titanium shade. Then with sponges and other brushes, started adding little details in the scratches and ridges and so on. I didn’t really have a plan on what parts to paint specifically, I just kept adding some here and there until I thought I needed to change colors and so on. When I had finished painting it late one night, I set it down and went to bed not really thinking about it. That seemed like the best thing to do though because the next day when I looked at it with a fresh eye, I really liked how it looked. For a project I had been so worried about (who am I kidding, I worry about every project), I was really proud of the way it turned out.